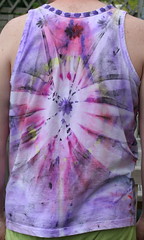

This started out as a white sleeveless vest, bought last year with the intention of dyeing it. It didn't happen then. Now enthused by Wardrobe Refashioning I'm beginning to put colour into the stash of white ready-made clothes that I've been collecting. Jim modelled the finished work for me but has declared it too flowery for him, and not really his colours either... which means I will either have to modify its paint job or alter it to fit me.
The prompt for Inspire me Thursday was "Show and Tell"
Here is what I did - though not with many pictures as I forgot about taking photos whilst wrapped up in the process:

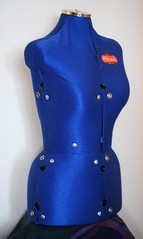
I started with a dressmaker's dummy. It is not precious - I got it at the end of May from a charity shop and its fabric is in poor condition. I extended it as far as it would go then I covered it with a black plastic bin liner and stood it on more plastic.
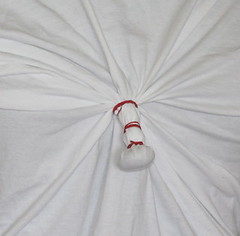
Then I put the garment onto it. It was quite a loose fit despite making the dummy as big as it would go. So I tied in a couple of stones, one on the front and one on the back with elastic bands around them. I used more elastic bands to tie in further folds until the fabric was fairly taut.

So far this is like tie dyeing (except for the dummy!).
You can see that the folds are creating a starburst or petal-effect in the material.
I then started playing with paints. I worked from lighter to darker and the first day's were all done wet and watery. The paints ran, and if they didn't run I sprayed them with water to make them run. I wanted them to spread and seep a little through the folds in the fabric which they did quite well.
I used Stewart Gill's Colourise fabric paints which are quite thick so needed water adding to make this happen. I painted some on around the tied stones and I painted thickly in places to see what that was like too. This was the first time I'd used this brand of paints.
I left it overnight to dry. Next day it was dry enough to work with non-runny techniques.
I used black. First of all I experimented with lightly rolling the paint onto the fabric with a small sponge roller. I noticed that the areas where the dummy was textured were being picked up and creating edges.
I then tried using some stamps to add texture. I put them behind the fabric and rollered over them. Although this worked reasonably well I'd have preferred the final effect if I'd skipped this stage.
I did some final rolling to ensure the folds were well marked.
Then I left it to dry, removed the elastic bands and stones then heat set it in the tumble drier.
I washed it by hand to find out how much dye would come out. The water was noticeably darkened but the fabric stayed painted so this must have been excess.
The stones bagged the fabric a lot and there is still a slight bagging where they had been, but that may well recover after another wash.
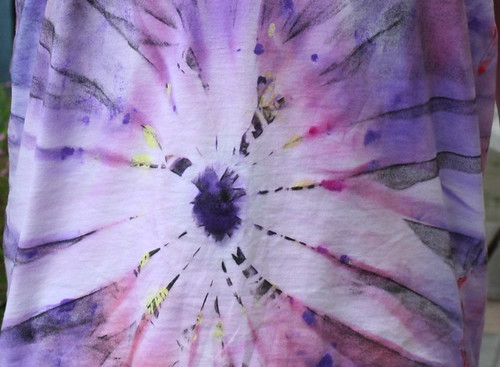
I really like this "flower" section:

And I like the way the folds go around the whole body creating a piece that could not have been done as separate pieces of material.
But I'm far less happy about the way the top part turned out. It just doesn't work with the rest.
And of course its also turned out that I probably shouldn't have used pinks and purples in a flowery pattern for Jim...
So this was an experiment that I've learnt a lot from. Now I just have to work out how to make it wearable!


20 comments:
Extremely cool. Reminds me of the chest-burster scene from 'Alien'
Actually, I think it looks great! Maybe not for a guy, though..lol. But it's a really cool effect...thanks for the tutorial!
Kyknoord - ah now that's an interesting perspective - does it make it more or less wearable?
Kathy - thanks - yes that's the problem as Jim sees it and its a really poor fit on me...
Tell Jim I think he is a real trooper to model for us.
I love the flowery effect, but you are right not for a guy.
Great tutorial. Perhaps if you wear it layered and belted that might work for you.
Quite fabulous! Not your retro-hippie tye-die but a whole new twist (forgive the pun, please). Lovely.
That looks fantastic! very creative!
Toni - I wish I'd realised from the beginning how flower like this was going to be... I wouldn't have used one of his potential vests...
jblack - thanks - yes the effect is good - shame it doesn't fit me!
arvindh - thank you!
Caroline this is beautiful! I love the flower but I must confess that it is the top part I love the most, you made it look like a necklace and it is so appealing to me!!! I think it is totally wearable, just not for yer dude:>
Valgalart - a necklace???? Oh-no now that makes it so much more less him... oh dear... thanks for your appreciation... I do have very mixed feelings about this one...
I have wondered just how this was done and your explanation is wonderfully done and easy to understand. And the end product is gorgeous!!
Wow!! You are so creative!
Thanks for the instructions...maybe one of these days when I'm not so overwhelmed:)
Teri C - thank you... maybe I'll have another go and start off on something that I can wear - lets hope it wasn't just beginner's luck.
Joy Eliz - thank you - I've always been drawn to fabric work but for some reason not done much.... looks like that is changing...
Looks wearable to me! If Jim doesn't want it send it my way! :) Thanks for the step-by-step, and tell Jim that only Real Men can wear a shirt like this and get away with it!
Oh I love it! My daughters favorite color is puple and I can see something similar on a cute little summer dress for her. Thanks for the directions, it sounds like a perfect summer project for the kids and I to try.
a.
This turned out so cool - isn't there some way you could shrink it down to your size, maybe with hot water? Or would all the dye come out then?? Darn!
I just love this effect - Thanks for the tutorial!
I know - tell Jim it's really not a flower - it's an automobile fan!
Do you have a largish friend you could give it to for their birthday?
That is soo cool! Very creative!
How very, very retro...will you be going to San Francisco with flowers in your hair? :-)
It looks beautiful, btw. I helped my daughter tiedie a few tops of hers a few years ago. We both had such fun!
I've been a bit tardy about visiting your blog in the past week and have missed some great bits of artwork. You've been rather prolific of late!
Thank you everyone... I've had an idea of what to do with it... if it works it'll figure here again... otherwise it'll join the dusters!
you da bomb!
that is great, I always wanted to try that!
Post a Comment