 |
| Ammonite (detail) in encaustic by Caroline |
Indeed one of the reasons I wanted to work in encaustic was that I hoped I'd be able to cope with them better than acrylics to which I seem to have developed an intolerance... and although Judy suggested using oil paints with the wax there was no need for turps or other solvents.... heat is the wax's solvent.
Judy and many of the participants are based in the US. This meant that I, and the few of us from the UK on the course, had to source our materials ourselves. I'll update this post (updated Aug 2016) with any new UK suppliers I find. (There were people from all over so we were not the only ones having to do our own sourcing - it was part of the fun!).
Update Aug 2016: Its become difficult to get good beeswax. It is possible to buy R&F encaustic medium ready made from Jackson's.
 |
| Making medium |
 |
| Medium cooling |
 | |
| Beeswax |
Suppliers of beeswax who have confirmed that their beeswax is filtered rather than chemically bleached (I have not been able to confirm with this one remaining supplier - Aug 2016)
- Summer Naturals - in 500g bags
 |
| Damar Resin or Gum |
- L.Cornellissen & Son
- Lawrence Artist Materials - they supplied the ones in the photo above
- Baldwins
- Jackson's supply Cornelissen's and Robersons Gum Damar

There are several tutorials on how to make encaustic medium on the web for instance Andrew Gott's Making Encaustic Medium, Rick Green's Making Wax Medium, as well as recipes from books. Lissa Rankin's book Encaustic Art has a recipe based on 10 lbs of beeswax that takes more than a day to melt.... I've been making either 1 lb or 500 g of beeswax based batches and these have taken more like an hour....
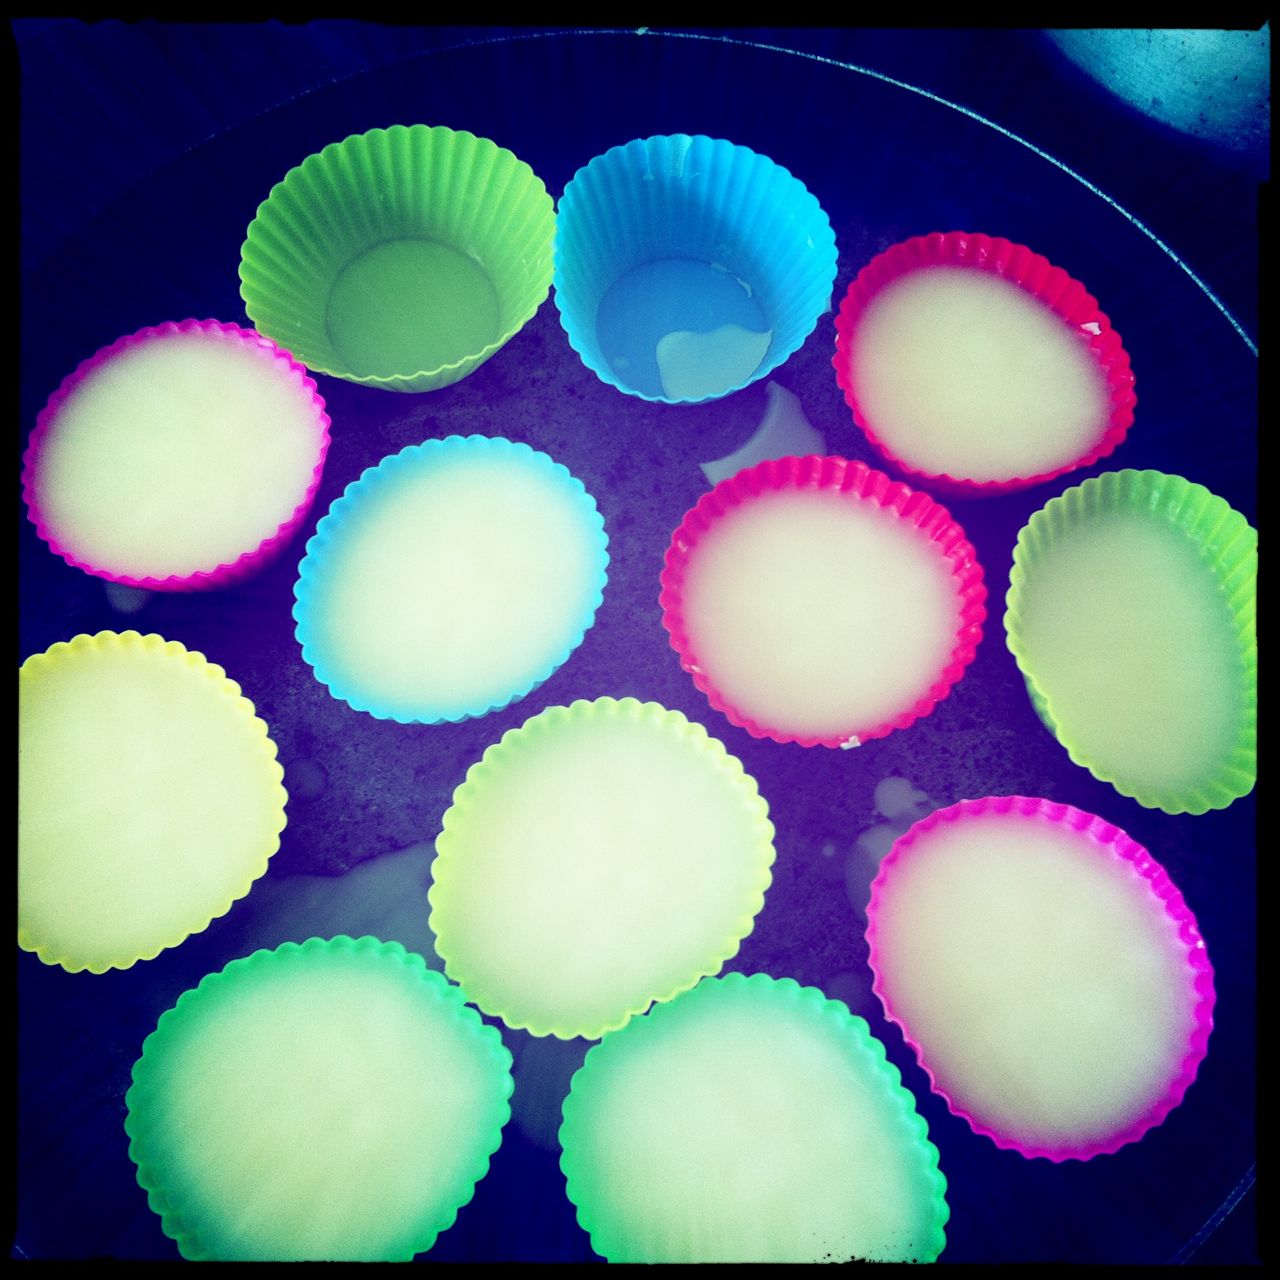
I used silicone moulds of various sorts to shape the wax. I found that some things sold as silicone moulds could not stand the heat and others were just too thin. My preferred moulds at this time are:
- Kitchen Craft Colourworks Silicone Cupcake Cases, pack of 12 (bought from amazon.co.uk)
- Cool Cook Mini Loaf Moulds 4 cup (bought from my local Kitchens shop)

Mostly I've used 8:1 as that seems to be a fairly standard starting point. If you need your medium to be harder you might go for 9:2 or even 4:1... whereas if you are working thinly on paper you might not add any damar at all...
Another problem I have had is in filtering the medium. The damar tends to contain a lot of twiggy, dirty bits that need removing. Lots of different suggestions for filtering are out there but I've not found any entirely successful.... Judy recommends using paper paint filters but I've not been able to find any... my coffee filters didn't work.... the jelly bag melted when I accidentally touched it with the saucepan.... the local make-your-own-beer shop's muslins are too coarse and let lots of bits through.... the sieves I've used are also too coarse.... etc!
At least the bits settle on the bottom so one can clean up the pieces of medium once its set.
One of the hardest things to source was a suitable hot palette. Originally I got an Andrew James Teppanyaki Grill:

Note the silver foil shielding the thermostatic "self-controller". My first thermostat failed after less than 6 weeks. They replaced it but said that as my use was "non-standard" they would not replace this one if it too failed. This was cramping my style as I was worried about it breaking...
So I have now splurged on a vastly more expensive hot palette - the A2+ Encaustic Hotplate from encaustic.com. This is a German made catering warming plate that is meant to be good at maintaining constant, relatively low temperatures compared to the Teppankai grill which was made to cook things on. If you are in Germany this is the same model, though not specifically sold for encaustics....
I have an anodised aluminium tray on top of the hotplate so that I can see what colours I'm using.

Of course if I don't need an especially large hot palette then a frying pan on top of the mini hob is good too.
I usually melt the wax on the grill before keeping it warm on the palette.
In this country if you mention encaustic to someone, if they've heard of it at all, they will imagine you mean painting with an iron. Sometime ago I got a kit with an iron and some sticks of encaustic paint and the strange shiny card that is recommended to use with it:

I find the iron uncomfortable to hold for long and I do not like the card so its not surprising that I have not taken to this style... though the paints smell lovely.... you can see my efforts on my Flickr stream here... I do know that many people love painting this way... its just not for me... the iron doubles as a tiny hot palette if one just wants to mix a little colour...
Colour... oh yes colour.... in the Hot Wax class Judy showed us how to mix medium with oil colours to make encaustic paints. Here is a colour wheel I did this way:

I started off with a cheap set of oil paints (which I used for the above wheel) and since then have bought some more expensive highly pigmented good quality oil paints, especially ones with good transparency. In class we just added the oil paints to the medium (whilst it was melted) but quite a few people advise soaking out the linseed oil beforehand on paper towels (or other absorbent material).
There is a very big difference between using homemade colours and the ready-made ones. I only began to really appreciate this when I attempted to do some monotype prints (having watched Paula Rowlands wonderful DVD). My homemade paints, although they looked strongly coloured were full of medium and made the paper very wet and not very colourful whilst the bought sticks made very strong marks that transferred well to the paper:

Encaustic paints available in the UK - the best are made in the US:
- R&F - 80 are available in the UK from Jacksons. R&F do ship to the UK but then there will be the possibility of customs duty to pay.
- Hot Cakes made by Enkaustikos - some of their colours are currently available in the UK on amazon.co.uk... though with a high shipping cost so they may be being shipped from the US... if you are prepared to order from the US another source is the FineArtStor.
Brushes... Its important to use non-synthetic bristles to avoid them melthing in the hot paint! Many people use cheap bristle brushes from hardware stores but I found some brushes I like a lot more:

The big wide ones are Hakes and the others are white and black goat's hair brushes from Daler-Rowney mops. My local art shops had the Daler-Rowney mops on offer so I stocked up after finding I liked them. When full of wax they simply let the colours glide on - here is the underpainting I made using them before covering it up to carve out the ammonite shown at the top.

Smaller brushes are useful when painting detail. Pick what you fancy but remember to use natural bristles.
Here are two version of mistletoe that I painted for Christmas. I did my drawing on the computer so was able to print out multiple copies. The first I attached to a thick piece of ply, the second I mounted, once finished, behind a hole cut from a canvas so that it was supported but let the light through.
In painting both of them I used encaustic as a resist for watercolour. The first one I then added pastels and more wax. The second one I left to show the translucency of the paper where it had been waxed. I was especially delighted that my green-gold paint was such a good mistletoe colour.
 |
| Mistletoe mounted on plywood |
 |
| Mistletoe on paper mounted to let light through |
Depending on how one applies the encaustic to the support one may need to fuse the most recent layer to the ones below. I started out using an embossing heat gun... this was slow and noisy. After a week I got a gas blow torch from my local B&Q. It is great to use for fusing but I was slightly reacting to the gas... so back to an electric heat gun.... this time in the form of an old paint stripping heat gun:
 |
| Gas blow torch |
 |
| Electric hot air guns |
My favourite supports so far are the cradled plywood boards that Jim has been making for me. I also buy thicker pieces of plywood form my local hardware shop when they are in their remnant section... as I'm now interested in monotyping I'll have to expand my paper collection... but that is something for this year!
 |
| Cradled plywood boards made by Jim |
 |
| Encaustic Abstract on cradled board |
Update 2016: Since moving and Jim not yet having a workshop set up I've been buying panels from Jacksons.
Incidentally if you are a new customer Jacksons will give you a 10% discount!


15 comments:
Wow! It is really a lot of steps, but the result worth it! Your "ammonite" is beautiful!!! :)
Hélène thank you - it was suddenly time to write about what I've been doing!
Fantastically detailed article Caroline. Very very informative. I love the base colours for the ammonite - I wondered how you'd started it. Jim makes very nice cradled boards - you're very lucky. I'm still having probs with the mitred corners coming out right.
Thanks Sue... Jim has problems with the mitred corners too... he's wondering about buying a new saw but hasn't yet... part of the problem comes from the fact that the squares cut for me by the local hardware shop aren't perfectly square.... but Jim has volunteered to do that much cutting!
fabulous detail nicely done!
What an incredible post! Wonderful information here, thank you for taking the time to post it and thank you for the link love.
Thanks huntla1 - were you on the course?
Thank you Judy - your course was the highlight of my year.
@Sue - there was meant to be a not in my previous comment to you.... Jim has NOT volunteered to do that much cutting.... I guess my not-conscious self is hoping he will!
Thank you for your very usefull post, Sue!
Happy New Year!
Best regards from Norway
Glad you liked my post Oxana - but my name is Caroline! :)
What a jam packed, fabulous post! Love it!
What a wonderfully detailed post about your encaustic experiences, Caro. Your lovely mistletoe pieces remind me of stained glass windows and your ammonite work is simply beautiful! I like your encaustic abstract too - it reminds me of New Year's fireworks. And Jim's cradleboards look very well-made. What fun you must be having with this new medium!
Happy New Year, Caroline! xx
p.s. I have a very fine mesh tea strainer and wondered if you had tried something like that for straining the resin (though it is rather a small item to pour through...). Or perhaps layers of cheesecloth? You may well have already tried both of those too, but thought I'd mention them, just in case...
p.p.s. (or is it 'p.s.s.?' I can never remember...) Thank you for sharing so much information about the whole process! xo
Thanks Amanda!
Terri - thank you for all those compliments!
And yes a fine mesh tea strainer is one of the things I've used... the advice I'd read was that muslin was finer than cheesecloth so I haven't tried it....
Hope you get a chance to try some encaustics sometime this year.
Hi Caroline.
I'm in Australia, and what I found worked to strain the damar / wax, was a Chux kitchen wipe over a large tin. Don't know what you would call them in the UK, but they're the blue and white striped disposable cloths. Another option would be kitchen paper towel supported inside a kitchen strainer.
Hi Alison
They sound similar to J cloths... I'm between studios at the moment but will give them a go when I'm back in one!
Thanks for the suggestion.
Caroline
Post a Comment